
Friday, January 6, 2012

Friday, December 23, 2011
LNS & Create w/Connie and Mary CCMC181 Challenge
Merry Christmas and Happy New Year everyone! My hope and prayer for you and your family is that the holidays are filled with much love, joy, peach and wonderful memories!
The cards below were made for this week's LNS Challenge, and Create with Connie and Mary CCMC181 Challenge (you can find the blog site HERE). The LNS challenge was to make a card using white, silver and blue. Connie and Mary's challenge was to make a card using white and silver. So I made the same style card for both challenges! They were both simple to make and I love the look of the house from the Christmas Lodge set, looks embossed with silver embossing powder. I then ripped the bottom edges of the cardstock, brushed the edges with a VersaMark pad, and then embossed the edges using silver embossing powder.
Card for Connie and Mary's Challenge (White/Silver):
 Stamps: Christmas Lodge
Inks: VersaMark Inkpad
Papers: Whisper White, Silver Glimmer Paper, Silver c/s
Accessories: Big Shot, Northern Frost Die, Vintage Wallpaper Embossing Folder, Silver Embossing Powder, Heat Gun, Whisper White Organza Ribbon, White Baker's Twine, Mini Jingle Bells, Silver 5/8" Neutrals Jumbo Brad, Dazzling Diamonds Glitter, 2-Way Glue Pen, Paper Piercing Tool, Dimensionals
LNS Challenge Card (White, Silver, Blue):

Same design as above, only I sponged some Bashful Blue and Night of Navy ink around the house. Here's what I used:
Stamps: Christmas Lodge
Inks: Bashful Blue, Night of Navy, VersaMark Inkpad
Papers: Whisper White, Night of Navy, Silver Glimmer Paper, Silver c/s
Accessories: Big Shot, Northern Frost Die, Vintage Wallpaper Embossing Folder, Silver Embossing Powder, Heat Gun, Whisper White Organza Ribbon, White Baker's Twine, Mini Jingle Bells, Silver 5/8" Neutrals Jumbo Brad, Dazzling Diamonds Glitter, 2-Way Glue Pen, Paper Piercing Tool, Dimensionals, Sponge
Card for Connie and Mary's Challenge (White/Silver):

Inks: VersaMark Inkpad
Papers: Whisper White, Silver Glimmer Paper, Silver c/s
Accessories: Big Shot, Northern Frost Die, Vintage Wallpaper Embossing Folder, Silver Embossing Powder, Heat Gun, Whisper White Organza Ribbon, White Baker's Twine, Mini Jingle Bells, Silver 5/8" Neutrals Jumbo Brad, Dazzling Diamonds Glitter, 2-Way Glue Pen, Paper Piercing Tool, Dimensionals
LNS Challenge Card (White, Silver, Blue):

Same design as above, only I sponged some Bashful Blue and Night of Navy ink around the house. Here's what I used:
Stamps: Christmas Lodge
Inks: Bashful Blue, Night of Navy, VersaMark Inkpad
Papers: Whisper White, Night of Navy, Silver Glimmer Paper, Silver c/s
Accessories: Big Shot, Northern Frost Die, Vintage Wallpaper Embossing Folder, Silver Embossing Powder, Heat Gun, Whisper White Organza Ribbon, White Baker's Twine, Mini Jingle Bells, Silver 5/8" Neutrals Jumbo Brad, Dazzling Diamonds Glitter, 2-Way Glue Pen, Paper Piercing Tool, Dimensionals, Sponge
MERRY CHRISTMAS EVERYONE!
Saturday, December 17, 2011
Home Decor Blog Hop!!

December Blog Hop: Holiday Home Decor
Welcome to another SUStars Blog Hop! This month we're sharing some inspired projects that can be used as home decor for the holidays. You have just arrived from Karen's Gibson's blog and viewing all of her wonderful projects! Click HERE if you need to go back for a second peek!!
Joy Banner
The first project is a Joy Banner, and I had a lot of fun making this banner. I have 2 stocking holders that I use to hang my children's stockings on. I thought it would be cute to hang the banner off of them. I love the cute mittens from Winter Wishes Stitched Felt pieces and used them on each end to create a loop to hand the banner on the stocking holders (as you can see in the pictures below). The banner was pretty easy to make, and I love how it turned out!. For the base of the banner, I made 2 stockings using Whisper White cardstock and 1 stocking using the Frostwood Lodge DSP, and the Holiday Stocking Die. I then used Whisper White and Frostwood DSP for the accent pieces for the stocking. The J and Y were made using the Serif Essentials Alphabet Dies and the Red Glimmer Paper. I used Sticky Strip Tape to secure the stockings to the ribbon. The following is a list of the supplies I used:
Stamps & Inks: None
Papers: Whisper White, Frostwood Lodge, Red Glimmer Paper
Accessories: Big Shot, Holiday Stocking Die, Serif Essentials Alphabet Dies, Petals-A-Plenty Embossing Folder, Winter Wishes Stitched Felt, Mini Jingle Bells, Cherry Cobbler Baker's Twine, Cherry Cobbler Buttons, Real Red Glimmer Brads, Chocolate Chip 1-1/4" Striped Grosgrain Ribbon, Snowflake Punch, 1/4" Punch, Dimensionals, Mini-Glue Dots, Sticky Strip Tape


Candle Holder
I found a candle holder on clearance at Land's End and wanted to "dress" it up for the holidays. I love how this turned out, and it really looks great in my dinning room! I used the Northern Frost Die to cut out snowflakes using Silver Glimmer Paper. I attached the snowflakes using mini-glue dots. To fill in the gaps between the snowflakes, I punched 1/4" circles from scraps I had of the Silver Glimmer paper, and attached them using Mini-Glue Dots. To give the snowflakes a more finished look, I added a pearl in the middle of each of them. What I love about this idea, is that you can dress up glass candle holders for any type of occasion using our awesome dies! Here's a list of what I used:
Papers: Silver Glimmer Paper
Accessories: Big Shot, Northern Frost Die, Basic Pearls Jewels, Candle Holder/Candles, Mini-Glue Dots


One more additional project that I am posting today - I made the ornament stocking below for this hop and this week's LNS challenge. Here's the details:
Stamps & Inks: None
Papers: Whisper White, Real Red, Early Espresso, Holly Berry Bouquet DSP
Accessories: Big Shot, Holiday Stocking Die, Serif Essentials Alphabet Dies, Petals-A-Plenty Embossing Folder, Northern Frost Die, Early Espresso & Real Red Buttons, Mini-Jingle Bells, White Baker's Twine, Real Red Ribbon, Mini-Glue Dots, Dimensionals

Thanks for stopping by! I hope you liked my banner and candle holder, and will be inspired to create your own holiday works of art! Your next stop will be the talented Jayne Stenstrom, and you can get to her blog by clicking HERE.
If you need to go back to anyone's blog, below is the list of bloggers:
1. Denise Foor, Studio PA
2. Raissa Stamps
3. Krafting with Karen
4. Stampin' Fevre
5. Jaynestamps
6. I Can Stamp 2
7. Stampin' Dragon
8. Stampin' & Scrappin' News
9. Stamping is My Therapy
10. Stampin' Tree House
11. Shari's Stamp Pad
1. Denise Foor, Studio PA
2. Raissa Stamps
3. Krafting with Karen
4. Stampin' Fevre
5. Jaynestamps
6. I Can Stamp 2
7. Stampin' Dragon
8. Stampin' & Scrappin' News
9. Stamping is My Therapy
10. Stampin' Tree House
11. Shari's Stamp Pad
Sunday, December 11, 2011
LNS Celebration Challenge
Sorry I haven't posted for awhile. I did back-to-back Holiday Boutiques last weekend, and spent this week playing catch up and was finally able to put up my Christmas decorations! Wrestling season has also started and that is now taking up our Friday nights and Saturdays. One more week of work and I'm off until the beginning of the year; the benefits of working at a school!
This week's LNS challenge was to make a card celebrating a birthday, etc. My card below is cased from a card that I saw on Heather Klump's blog. You can see all of Heather's amazing projects on her blog HERE. I actually made this card a couple of weeks ago, so I hope I can remember all the supplies I used! The following is my "attempt" at listing my supplies:

Stamps: Happiest Birthday Wishes, Pennant Parade
Inks: Tempting Turquoise, Melon Mambo, Old Olive, Daffodil Delight
Papers: Whisper White, Tempting Turquoise, Melon Mambo, Old Olive, Daffodil Delight
Accessories: Big Shot, Perfect Polka Dot EF, Scallop Punch, 1-1/4" Circle Punch, Decorative Label Punch, Petite Pennants Builder Punch, Melon Mambo Ribbon, Certainly Celery Brads, White Baker's Twine, Mini Glue Dots, Dimensionals
This week's LNS challenge was to make a card celebrating a birthday, etc. My card below is cased from a card that I saw on Heather Klump's blog. You can see all of Heather's amazing projects on her blog HERE. I actually made this card a couple of weeks ago, so I hope I can remember all the supplies I used! The following is my "attempt" at listing my supplies:

Stamps: Happiest Birthday Wishes, Pennant Parade
Inks: Tempting Turquoise, Melon Mambo, Old Olive, Daffodil Delight
Papers: Whisper White, Tempting Turquoise, Melon Mambo, Old Olive, Daffodil Delight
Accessories: Big Shot, Perfect Polka Dot EF, Scallop Punch, 1-1/4" Circle Punch, Decorative Label Punch, Petite Pennants Builder Punch, Melon Mambo Ribbon, Certainly Celery Brads, White Baker's Twine, Mini Glue Dots, Dimensionals
Friday, December 2, 2011
Top Note Die Gift Card Holder
This week's LNS challenge is to make some sort of gift card holder, and below if one of several that I made for the Holiday Boutiques that I will at this weekend. These gift card holders are very simple and easy to make. Probably the hardest part is figuring out how you want to embellish the front! I cut (2) Whisper White Top Note dies and (2) dies using designer paper. I cut one of the top note designer papers in half to create the pocket for the gift card holder. I trimmed the outline on the full-size piece of DSP and mounted in on one of the Whisper White dies and mounted the 1/2 top note DSP onto the other WW c/s. I then attached both pieces together by attaching a Baja Breeze Corduroy Button Brad - this way you can swing the top piece open. Hope this makes sense......

Stamps: Happy Holidays (retired SU! stamp)
Inks: Baja Breeze
Papers: Whisper White, Ski Slopes DSP (retired)
Accessories: Big Shot, Top Note Die, Oval Punch, White Baker's Twine, Baja Breeze, Corduroy Buttons/Brads, Winter Wishes Stitched Felt, Paper Piercing Tool, Dimensionals, Scissors

Stamps: Happy Holidays (retired SU! stamp)
Inks: Baja Breeze
Papers: Whisper White, Ski Slopes DSP (retired)
Accessories: Big Shot, Top Note Die, Oval Punch, White Baker's Twine, Baja Breeze, Corduroy Buttons/Brads, Winter Wishes Stitched Felt, Paper Piercing Tool, Dimensionals, Scissors
Thursday, November 24, 2011
Final Challenge Card
Happy Thanksgiving everyone! This is my last post for a while, as we are going to be taking a break from doing challenges for Creative Sketches. This is a quick card that I made for today's challenge; which is:

And below is my card. Sorry for the quick post, but I have a house full of company coming and it's my birthday (56 is just a number, right?). Happy Thanksgiving!

Stamps: Happy Holidays (retired SU stamp)
Inks: Garden Green
Papers: Whisper White, Real Red, Deck the Halls DSP (retired), Red Glimmer Paper
Accessories: Big Shot, Scallop Oval Die, Perfect Polka Dots EF, Pinking Hearts Border Punch, Oval Punch, Small Star Punch, Real Red/Whisper White Retired Ribbon, White Baker's Twine, Holly Berry Bouquet Buttons, Dimensionals, Mini Glue Dots
And below is my card. Sorry for the quick post, but I have a house full of company coming and it's my birthday (56 is just a number, right?). Happy Thanksgiving!

Stamps: Happy Holidays (retired SU stamp)
Inks: Garden Green
Papers: Whisper White, Real Red, Deck the Halls DSP (retired), Red Glimmer Paper
Accessories: Big Shot, Scallop Oval Die, Perfect Polka Dots EF, Pinking Hearts Border Punch, Oval Punch, Small Star Punch, Real Red/Whisper White Retired Ribbon, White Baker's Twine, Holly Berry Bouquet Buttons, Dimensionals, Mini Glue Dots
Tuesday, November 22, 2011
Dressing up Candles
I have the honor of being a part of the Stampin' Fun and Friends Christmas Dreams design team for the month of November. You can check out the blog and projects HERE. Decorating a candle is very easy. I cut out the snowflakes using the Northern Frost Die and Stampin' Up!'s awesome Silver Glimmer paper. I used a paper piercing tool to poke a small hole and then anchored a a snowflake using a Circle Fire Rhinestone Brads to the candle. Very easy, but has such an elegant look! I also used a 3/4" circle punch to accent and fill in where needed with Silver Glimmer paper. What do you think? I will also be selling these candles at the upcoming Holiday Boutiques I will participating in on December 3rd and 4th!


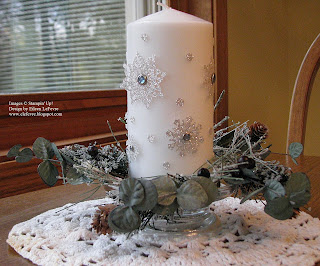
I bought the candle holder shown below years ago on clearance from Land's End. I thought I would try and "dress" it up a bit. Again, I used the Silver Glimmer paper and Northern Frost die for the snowflakes. This time I attached the snowflakes to the glass candle holders using mini-glue dots. I then added pearls in the middle. I like the look, and it is so pretty when you light all the candles!


Thanks for stopping by and taking a look - here's a list of supplies:
Accessories: Big Shot, Northern Frost Die, Silver Glimmer Paper, Rhinestone Brads, Pearls, Mini-Glue Dots, Paper Piercing Tool, Candles


I bought the candle holder shown below years ago on clearance from Land's End. I thought I would try and "dress" it up a bit. Again, I used the Silver Glimmer paper and Northern Frost die for the snowflakes. This time I attached the snowflakes to the glass candle holders using mini-glue dots. I then added pearls in the middle. I like the look, and it is so pretty when you light all the candles!


Thanks for stopping by and taking a look - here's a list of supplies:
Accessories: Big Shot, Northern Frost Die, Silver Glimmer Paper, Rhinestone Brads, Pearls, Mini-Glue Dots, Paper Piercing Tool, Candles
Sunday, November 20, 2011
Ho Ho Christmas Banner
Look what I made last night - I treated myself for my birthday and purchased the Serif Essentials Alphabet Dies. This banner was so easy to put together! The only thing NOT made with my Big Shot are the felt wreath and the snowflakes/flowers. One more reason why I LOVE my Big Shot - it makes projects like this so easy to do! To hang the banner, I secured some gold cording on the back with 3-4 mini-glue dots and then put a 3/4" Real Red circle punch over the cording, and then added a couple more glue dots. Since they are so easy to make, I think crank out a couple more for the upcoming Holiday Boutiques I will be at December 3rd and 4th. Here's what I used for this fun, and super easy project:

Papers: Whisper White, Red Glimmer Paper, Garden Green, Real Red, Retired SU! DSP
Accessories: Big Shot, Serif Essentials Alphabet Dies, Holiday Stocking Die, Petals-a-Plenty EF, Snow Burst EF, Stocking Accents Die, 3/4" and 1/4" Circle Punches, 5-Petal Flower Punch, Retired SU! Snowflake Punch, Real Red Glimmer Brad, Winter Wishes Stitched Felt, Chocolate Chip 1-1/4" Striped Grosgrain Ribbon, Paper Piercing Tool, Mini-Glue Dots, Dimensionals, Gold Cording

Papers: Whisper White, Red Glimmer Paper, Garden Green, Real Red, Retired SU! DSP
Accessories: Big Shot, Serif Essentials Alphabet Dies, Holiday Stocking Die, Petals-a-Plenty EF, Snow Burst EF, Stocking Accents Die, 3/4" and 1/4" Circle Punches, 5-Petal Flower Punch, Retired SU! Snowflake Punch, Real Red Glimmer Brad, Winter Wishes Stitched Felt, Chocolate Chip 1-1/4" Striped Grosgrain Ribbon, Paper Piercing Tool, Mini-Glue Dots, Dimensionals, Gold Cording
Thursday, November 17, 2011
Creative Sketches Challenge
I used a retired SU holiday kit for some of the items used in my card for this week's Creative Sketches Challenge. Here is the sketch:

And below is my card. I found some DSP and punch outs from an old SU holiday kit and used them on this card. I can't even tell you the name of the kit; it's that old! But here's the list of items I used:

Stamps: None
Papers: Whisper White, Real Red, Retired DSP
Inks: None
Accessories: Big Shot, Petals-a-Plenty EF, Stocking Builder Punch, Mini Jingle Bells, Cherry Cobbler Baker's Twine, Real Red Brads, Green Galore Brads, Paper Piercing Tool, Dimensionals

And below is my card. I found some DSP and punch outs from an old SU holiday kit and used them on this card. I can't even tell you the name of the kit; it's that old! But here's the list of items I used:

Stamps: None
Papers: Whisper White, Real Red, Retired DSP
Inks: None
Accessories: Big Shot, Petals-a-Plenty EF, Stocking Builder Punch, Mini Jingle Bells, Cherry Cobbler Baker's Twine, Real Red Brads, Green Galore Brads, Paper Piercing Tool, Dimensionals
Sunday, November 13, 2011
More Holiday Boutique Shares
Thought I would share 2 more items I will be selling at the upcoming Holiday Boutiques I will be participating in.
The box below is actually on the clearance rack on the SU! site. You get a package 5 boxes for ONLY .99!!! So I bought a bunch of them, and they are so cute once you "dress" them up - especially if you use the Winter Wishes Stitched Felt pieces and the cute Holly Berry Boutique Buttons from the Holiday Mini! I punched out 5 circles for the wreath using a 1/4" circle punch and the Red Glimmer DSP, and used mini-glue dots and dimensionals to attach the embellishments.
 Stamps, Inks: None
Papers: Red Glimmer Paper
Accessories: Holly Berry Bouquet Designer Buttons, Winter Wishes Stitched Felt, Cherry Cobbler Baker's Twine, Snowflake Punch, 1/4" Circle Punch, Real Red Glimmer Brad, Treat Box, Mini-Glue Dots, Stampin' Dimensionals, Paper Piercing Tool
I really like how the calendar/mini post-it-note holder turned out. I found a stash of Botanical Gazette DSP to use for the background. I stamped 2 flowers and used a blender pen to soften the edges. Cut then out and popped them up with dimensionals. The details on what I used is below:

Stamps: Field Flowers, Nature Walk (bee)
Inks: Cherry Cobbler, Old Olive, Early Espresso
Papers: Very Vanilla, Cherry Cobbler, Early Espresso, Botanical Gazette DSP
Accessories: Scallop Trim Border Punch, Distressing Tool, Early Espresso Brads, Paper Piercing Tool, Mat Pack, SAMJ, Calendar, Mini Post-it-Note, CD Case, Dimensionals, Sticky Strip Tape, Blender Pen
The box below is actually on the clearance rack on the SU! site. You get a package 5 boxes for ONLY .99!!! So I bought a bunch of them, and they are so cute once you "dress" them up - especially if you use the Winter Wishes Stitched Felt pieces and the cute Holly Berry Boutique Buttons from the Holiday Mini! I punched out 5 circles for the wreath using a 1/4" circle punch and the Red Glimmer DSP, and used mini-glue dots and dimensionals to attach the embellishments.

Papers: Red Glimmer Paper
Accessories: Holly Berry Bouquet Designer Buttons, Winter Wishes Stitched Felt, Cherry Cobbler Baker's Twine, Snowflake Punch, 1/4" Circle Punch, Real Red Glimmer Brad, Treat Box, Mini-Glue Dots, Stampin' Dimensionals, Paper Piercing Tool
I really like how the calendar/mini post-it-note holder turned out. I found a stash of Botanical Gazette DSP to use for the background. I stamped 2 flowers and used a blender pen to soften the edges. Cut then out and popped them up with dimensionals. The details on what I used is below:
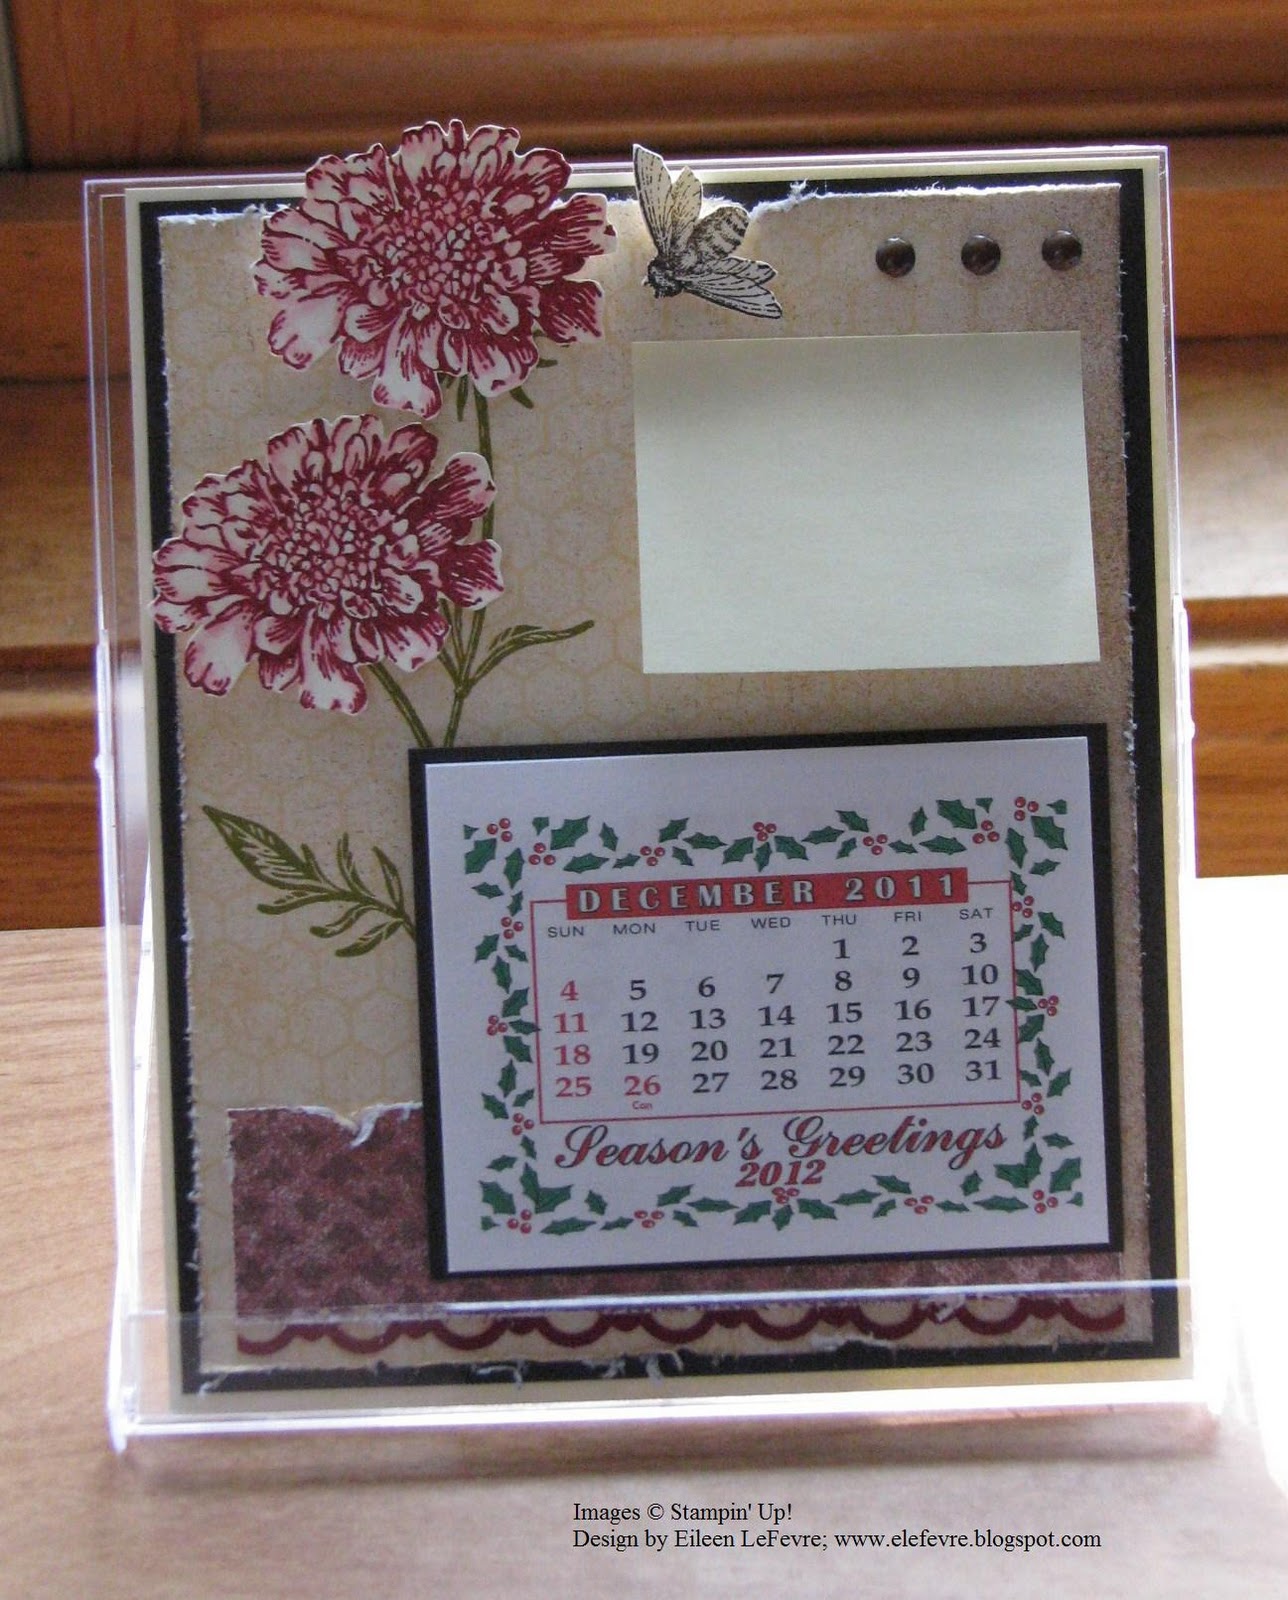
Stamps: Field Flowers, Nature Walk (bee)
Inks: Cherry Cobbler, Old Olive, Early Espresso
Papers: Very Vanilla, Cherry Cobbler, Early Espresso, Botanical Gazette DSP
Accessories: Scallop Trim Border Punch, Distressing Tool, Early Espresso Brads, Paper Piercing Tool, Mat Pack, SAMJ, Calendar, Mini Post-it-Note, CD Case, Dimensionals, Sticky Strip Tape, Blender Pen
Friday, November 11, 2011
Stocking Gift Card Holder
Below is another gift card holder that I am making for the craft boutique. Basically it's 2 stockings made using the Holiday Stocking die from the Holiday Mini - I cut one stocking using Real Red c/s, and the other using Holly Berry Bouquet DSP. I used some sticky strip tape and put it across the middle of the Real Red stocking, and then attached the DSP stocking to it. These creates the pocket for the gift card. I then sewed the 2 stockings together using my trusty Singer sewing machine (I have had this baby since 1976!). I cut a 12" x 2" strip of Silver Glimmer paper and ran it through the Big Shot, using the Northern Frost Die. I used 3 of the snowflakes from the strip and attached a Garden Green button tied with Early Espresso Baker's Twine. I cut out 2 circles from the Red Glimmer paper using a 1/4" circle punch, and attached them in the middle of the snowflakes using mini-glue dots. I ran the accent stocking pieces through the Big Shot using the Petals-a-Plenty embossing folder. Next I added a line of Dazzling Diamonds glitter along the end, and added a saying punched out using a small oval punch. I love the dies and how easy they are for creating some really cute, fast and fun projects!

Stamps: Happy Holidays saying (retired SU stamp)
Inks: Real Red
Papers: Real Red, Whisper White, Silver and Red Glimmer DSP, Holly Berry Bouquet DSP
Accessories: Big Shot, Holiday Stocking Die, Petals-a-Plenty EF, Northern Frost Die, Scallop Trim Border Punch, Small Oval Punch, 1/4" Circle Punch, Garden Green Button, Early Espresso Baker's Twine, Dazzling Diamonds Glitter, 2-Way Glue Pen, Sticky Strip Tape, Mini-Glue Dots, Dimensionals, Sewing Machine/Thread

Stamps: Happy Holidays saying (retired SU stamp)
Inks: Real Red
Papers: Real Red, Whisper White, Silver and Red Glimmer DSP, Holly Berry Bouquet DSP
Accessories: Big Shot, Holiday Stocking Die, Petals-a-Plenty EF, Northern Frost Die, Scallop Trim Border Punch, Small Oval Punch, 1/4" Circle Punch, Garden Green Button, Early Espresso Baker's Twine, Dazzling Diamonds Glitter, 2-Way Glue Pen, Sticky Strip Tape, Mini-Glue Dots, Dimensionals, Sewing Machine/Thread
Top Note Die Gift Card Holder
I am working on projects for an upcoming Craft Boutique in December, and came up with this gift card holder using the Top Note Die. It's pretty simple to make. I ran 2 pieces each of Whisper White and Cherry Cobbler through the Big Shot using the Top Note Die. I then ran both of the white cardstock pieces through the Big Shot using the Northern Flurry Embossing Folder. I cut the border off one of the pieces of the Whisper White Top Note die, and then layered in a piece of Cherry Cobbler c/s. I then cut on of the pieces of Cherry Cobbler c/s in-half to create the pocket for the gift card holder. I used the Frostwood Lodge DSP, Stocking Builder Punch and scrap pieces of SU's awesome glitter paper for the stockings. I punched out a snowflake using a retired SU punch and attached the snowflake and a brad. The brad was placed through both the gift card holder front and the bottom layer of the Whisper White c/s. Here's the details:


Stamps: Pennant Parade (Merry), and Happy Holidays retired SU stamp
Inks: Cherry Cobbler, Early Espresso
Papers: Whisper White, Cherry Cobbler, Frostwood Lodge DSP, Glimmer Paper
Accessories: Big Shot, Top Note Die, Northern Flurry EF, Stocking Builder Punch, Snowflake Punch, Oval Punch, Word Window Punch, Early Espresso Baker's Twine, Mini Jingle Bells, Silver Glimmer Brads, Paper Piercing Tool, Stampin' Dimensioanls


Stamps: Pennant Parade (Merry), and Happy Holidays retired SU stamp
Inks: Cherry Cobbler, Early Espresso
Papers: Whisper White, Cherry Cobbler, Frostwood Lodge DSP, Glimmer Paper
Accessories: Big Shot, Top Note Die, Northern Flurry EF, Stocking Builder Punch, Snowflake Punch, Oval Punch, Word Window Punch, Early Espresso Baker's Twine, Mini Jingle Bells, Silver Glimmer Brads, Paper Piercing Tool, Stampin' Dimensioanls
Thursday, November 3, 2011
Creative Sketches Challenge Card
Thanks for stopping by for this week's Creative Sketches Challenge. Fun challenge this week and I had a fun time using the new die, Stocking Accents from the Holiday Mini, for this card. Here is the sketch:

And below is my card. Because I am a paper "horder", I used scrap pieces of Real Red Card Stock and Holly Berry Bouquet DSP for the ornaments. I thought the DSP ornaments needed to have a defined color behind them. So I cut 2 Real Red ornaments and used them as backing for each DSP ornament. I had some left over retired tinsel ribbon and used that for a border. I tied some silver cording around the neck of each ornament, and then added a jingle bell. Here's a list of what I used:

Stamps: Happy Holiday stamp
Inks: Chocolate Chip, Real Red Marker
Papers: Real Red, Very Vanilla, Holly Berry Bouquet DSP
Accessories: Big Shot, Stocking Accents Die, Petals-a-Plenty Embossing Folder, Lace Ribbon Border Punch, Small Oval Punch, Jingle Bells, Tinsel Ribbon, Silver Cording, Stampin' Dimensionals, Mini-Glue Dots
And below is my card. Because I am a paper "horder", I used scrap pieces of Real Red Card Stock and Holly Berry Bouquet DSP for the ornaments. I thought the DSP ornaments needed to have a defined color behind them. So I cut 2 Real Red ornaments and used them as backing for each DSP ornament. I had some left over retired tinsel ribbon and used that for a border. I tied some silver cording around the neck of each ornament, and then added a jingle bell. Here's a list of what I used:

Stamps: Happy Holiday stamp
Inks: Chocolate Chip, Real Red Marker
Papers: Real Red, Very Vanilla, Holly Berry Bouquet DSP
Accessories: Big Shot, Stocking Accents Die, Petals-a-Plenty Embossing Folder, Lace Ribbon Border Punch, Small Oval Punch, Jingle Bells, Tinsel Ribbon, Silver Cording, Stampin' Dimensionals, Mini-Glue Dots
Tuesday, November 1, 2011
BIG SHOT AND HOSTESS BENEFITS GIVE AWAY!
November is my birthday month, and I am
GIVING AWAY A BIG SHOT!
GIVING AWAY A BIG SHOT!

- I will offering FREE shipping on all orders!
- Your order must be $50.00 or more to be eligible to win a Big Shot. Your name will then be entered into a drawing to win the Big Shot - the more your order, the more chances you have of winning!
- I will be ALSO BE GIVING AWAY THE HOSTESS BENEFITS!!! Which can amount to $85.00 in FREE product with the promotion Stampin' Up! is doing right now!
- Deadline to email me your order is: Saturday, November 5th
Thursday, October 27, 2011
Creative Sketches Challenge Card
Welcome to this week's Creative Sketch Challenge. I am a little under the weather right now with what I am hoping is not the flu, and almost didn't get my card done this week. Below is this week's sketch; please consider playing along!! You can upload your challenge card HERE.


And below is my card and list of what I used to make it. Thanks for stopping by and I hope you are having a great Thursday!

Stamps: Retired SU! Happy Holidays Stamp
Inks: Cherry Cobbler Inkpad and Marker
Papers: Whisper White, Cherry Cobbler, Frostwood Lodge DP
Accessories: Big Shot, Scallop Circle Bigz Die, Petals-a-Plenty EF, Snowflake Punch, Red Glitter Brad, 1/4" Circle Punch, 1-1/4" Square Punch, Decorative Label Punch, Winter Wishes Stitched Felt, Mini Glue Dots, Dimensionals
Subscribe to:
Posts (Atom)