Labels

Showing posts with label LNS Challenge. Show all posts

Thursday, November 8, 2012

PI Case - LNS Challenge

This week's LNS challenge is to case a card from Pinterest.  I have to admit that I am addicted to PI, and love all the ideas, recipes, etc.!  Below is the card that I cased that was made by the awesomely talented Vicki Burdick, and you can find a link to her blog HERE.


Below is my version of Vicki's card.  I went with Crumb Cake and Rich Razzleberry for my card, but I think I like the color combo that Vicki did better.  Here's the details:


Stamps: Blooming with Kindness
Inks: Rich Razzleberry, Crumb Cake
Papers: Very Vanilla, Rich Razzleberry, Crumb Cake, Typing Paper (to create the mask for Apothecary Accents outline)
Accessories: Big Shot, Apothecary Accents Die, Fancy Fan EP, Very Vanilla Satin Ribbon, Pearls, Essentials Paper Piercing Pack, Paper Piercing Tool, Stampin' Pierce Mat, Sponge, Dimensionals

Friday, November 2, 2012

LNS Thanksgiving

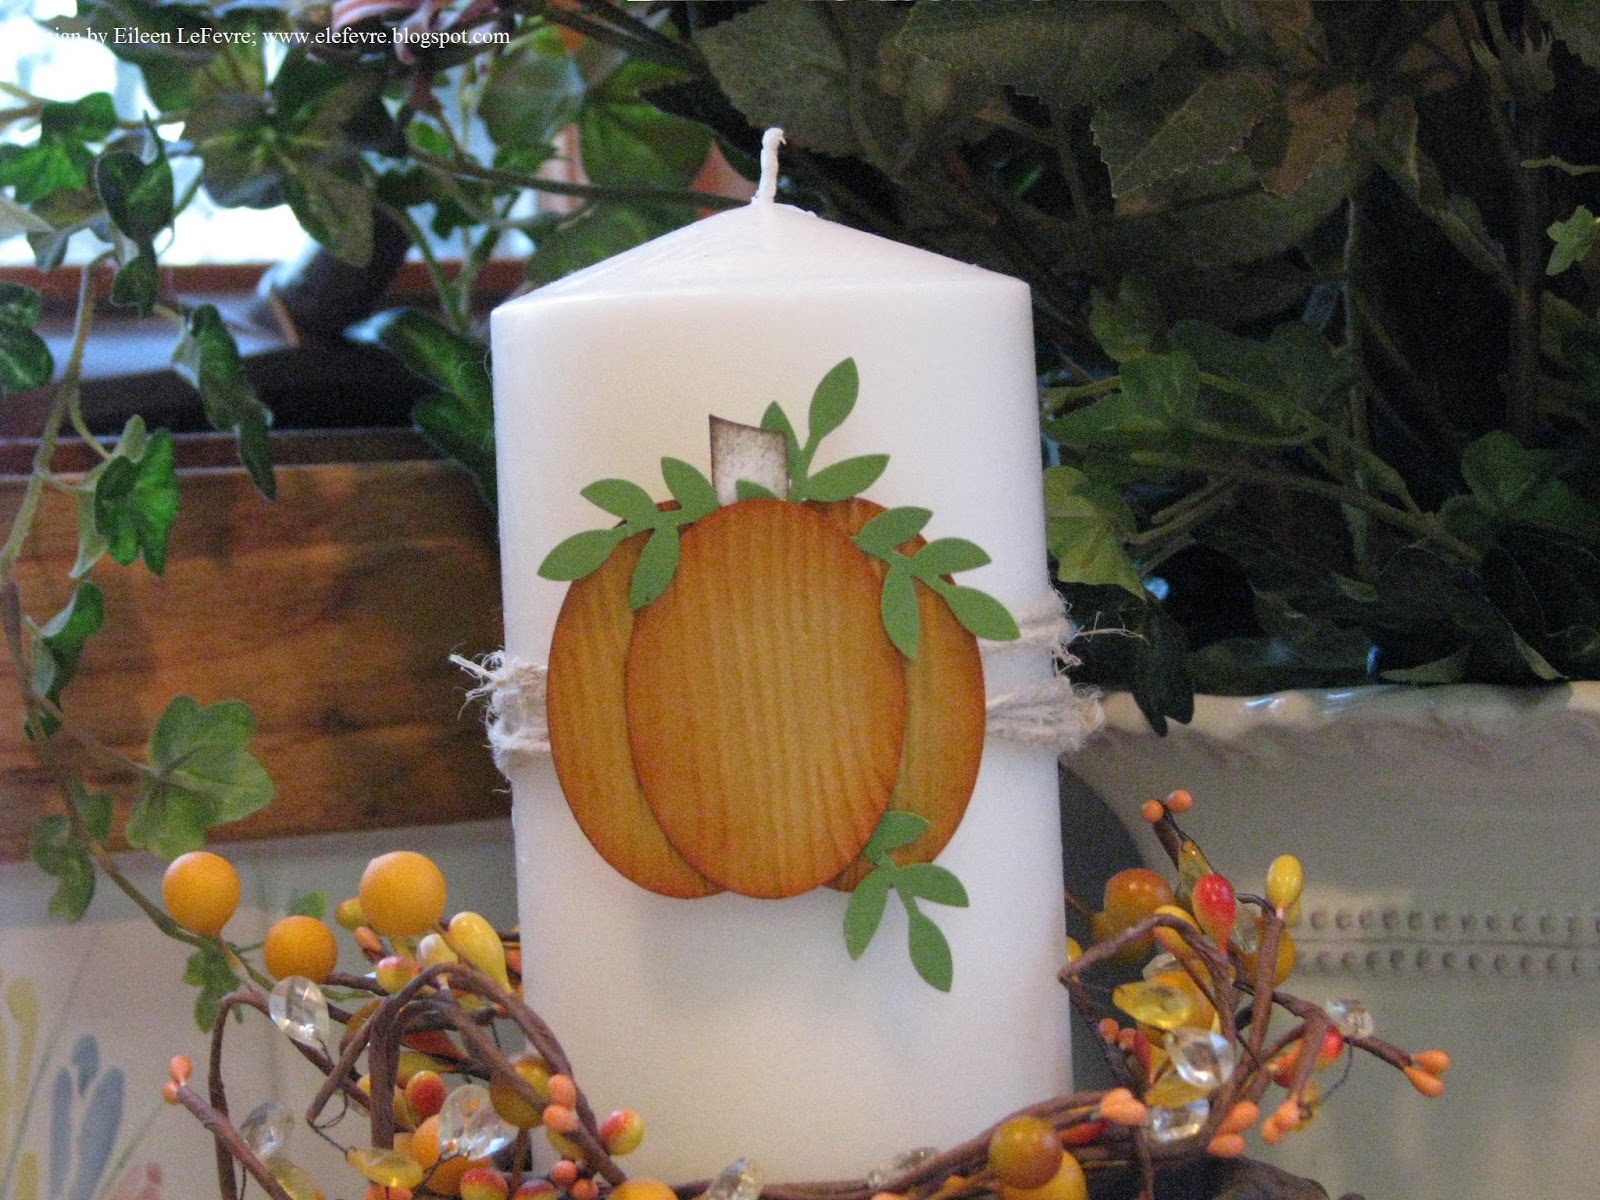
This has been a crazy week for me and I was finally able to get back into my craft room this morning to do this weeks LNS challenge.  The theme this week is Thanksgiving, and below is a candle that I "dressed up" for my kitchen.  I used the large oval punch for the pumpkin using More Mustard c/s, and then sponged the edges with Pumpkin Pie ink.  I ran the oval pieces through the new Woodgrain EF and the Big Shot to add some texture.  The leaves were made using the Bird Punch and the Word Window Punch for the stem for the pumpkin stem.


Inks: Pumpkin Pie, Soft Suede (stem)
Papers: More Mustard, Gumball Green, Whisper White
Accessories: Big Shot, Large Oval Punch, Bird Builder Punch, Word Window Punch, Twine, Candle, Sponge, Dimensionals, Mini-Glue Dots

Thursday, October 18, 2012

CAS LNS Challenge

Happy Thursday everyone!  Hope you are having a great day!  This week's LNS challenge is to design a card with as much white on it as possible.  I saw a card on Pinterest that paired subtle colors with the great set, Lovely as a Tree.  I found the creator of the card I cased below, and you can visit the website HERE to view Lynda's card.

Here is my card.  It was pretty simple to do.  I embossed the trees from Lovely as a Tree using Ivory EP.  I have had several SU embossing powders for years, and keep all of them in air tight Tupperware containers - I guess that does the trick!

After I embossed the trees, I gently rubbed some Bashful Blue and Certainly Celery over the different areas using a sponge.  What I didn't know is that one of the sponges had some Soft Suede on it and it kind of "muddied" up the area where I put applied the Certainly Celery.  I created a mask used my 1" circle punch and a post-it-note for the sun.

Here's the rest of the details:


Stamps: Lovely as a Tree, Watercolor Trio (saying)
Inks: Certainly Celery, Bashful Blue, So Saffron (and a "dash" of Soft Suede)
Papers: Whisper White, Bashful Blue
Accessories: Ivory EP, Heat Gun, Dimensionals, Sponges, 1" Circle Punch, Post-it-Note

Thursday, October 11, 2012

LNS - Wood Challenge


This week's LNS challenge is to create a card, scrapbook page, project, or anything else you can think of that uses wood, and below is the card that I created.

First I ran the white c/s through the Big Shot using the new Woodgrain EF, and then swiped the Soft Suede IP over the front.  I like how it turned out - what do you think?  I then stamped the leaves from French Foliage using different IP, and cut them out.  Added a button and banner, and some baker's twine.  Here's the details:


Stamps: French Foliage, Just Believe (saying)
Inks: Soft Suede, Cajun Craze, Gumball Green, Midnight Muse, Pumpkin Pie
Papers: Whisper White, Soft Suede
Accessories: Big Shot, Woodgrain EF, 1-1/4" Square Punch, Designer Natural Button, Early Espresso Baker's Twine, Dimensionals, Scissors

Thursday, September 27, 2012

LNS Challenge - Paper Tearing

Happy Thursday; hope you're having a great day!  This week's LNS challenge is a fun one - paper tearing!  I thought I would create CAS cards with a masculine theme for my projects using one of my favorite sets, Serene Silhouettes.  Below are the details:


This is a really simple CAS card.  I thought about adding some baker's twine, but decided to go with brads in the corner and keep it simple.

Stamps: Serene Silhouettes, Teeny Tiny Wishes
Inks: Gumball Green, Midnight Muse, Soft Suede, Pumpkin Pie, Cajun Craze
Papers: Whisper White, Gumball Green, Midnight Muse, Soft Suede, Crumb Cake
Accessories: Night of Navy Brads, Post-it-Note Holder, 1-1/4" Circle Punch, Dimensionals, Sponge


Another CAS card, but this time I went with the baker's twine.


Stamps: Serene Silhouettes, Teeny Tiny Wishes, Itty Bitty Backgrounds
Inks: Gumball Green, Midnight Muse, Soft Suede
Papers: Whisper White, Midnight Muse, Soft Suede
Accessories: Early Espresso Baker's Twine, Neutral Button, Distressing Tool, Dimensionals, Sponge

Thursday, September 13, 2012

This week's LNS Challenge is............
Challenge 190

One Layer with a WOW


This week we are getting Back to the Basics! We want you to create a ONE LAYER card (card base only) but you MUST add a technique that gives your card that extra something that you don't have since there are no layers!

The technique I used for this card is called "thumping".  Basically you ink up your image and then take a contrasting color/marker and "thump" the tip of the marker on the stamped image.  I then spritzed a little water on the image before I stamped it.  I then added some Midnight Muse Ribbon at the top of the card and there you have it - a Back to Basics card with no layers!


Stamps: Serene Silhouettes, Teeny Tiny Wishes
Paper: Whisper White
Inks: Gumball Green
Markers: Midnight Muse
Accessories: Midnight Muse Ribbon, SAMJ, Scissors, Water Bottle/Water

Sunday, September 9, 2012

Another LNS Challenge Card

I have been seeing a lot of the three layer cards on Pinterest lately and thought I would give it a try, and below is the card that I came up with.   One of these days I'll have to figure out how to use my iPad to make videos....but in the meantime, Dawn Olchefske has a great video on her blog showing how to make a three layer card, and you can find it HERE.

The dimensions to use when making this card are:

Whisper White c/s: 2" x 3-1/4", 3" x 4-1/4" and 4" x 5-1/4"
Layering c/s: 2-1/4" x 3-1/2", 3-1/4" x 4-1/2" and 5-1/2" x 8-1/2" (scored at 4-1/4")

Here is my card, and a list of the supplies I used:


Stamps: French Foliage, Teeny Tiny Wishes
Inks: Midnight Muse, Gumball Green, Soft Suede
Papers: Whisper White, Midnight Muse, Soft Suede
Accessories: Naturals Designer Button, Word Window Punch, White Baker's Twine, Dimensionals, Sponges, Scissors

Thursday, July 26, 2012

Christmas in July LNS Challenge

This week's LNS challenge is to make any type of Christmas project.  For my first project, I embossed the lodge from the set, Christmas Lodge, on to a piece of Very Vanilla using Vanilla EP, a VersaMark IP and a heat gun.  I then used a sponge and rubbed Cherry Cobbler ink over the embossed image.  I wanted to use a shape other than a square for the main focal point, and decided to cut out the lodge image using one of the framelits from the Labels Collection Framelits.  I used the same framelit to cut out a piece of Cherry Cobbler c/s, and cut off the ends and layered them behind the image.  I used the new awesome SU! Paper-Piercing Pack to paper pierce just the ends.

The background image on the large piece of Very Vanilla c/s was made using the Northern Flurry Folder and I used the new Fancy Fan EF on the Cherry Cobbler strips.  Did you know that the 1" square punch is perfect to use to make the indentations on 1" strips, and the same goes for using the 1-1/4" square punch on the same size strips?  Here's the list of what I used:


Stamps: Christmas Lodge
Inks: Cherry Cobbler, VersaMark
Papers: Whisper White, Cherry Cobbler
Accessories: Big Shot, Northern Flurry EF, Fancy Fold EF, Labels Collection Framelit, 1-1/4" Square Punch, Paper-Piercing Pack, Paper Piercing Tool, Vintage Faceted Designer Button, Gumball Green Satin Ribbon, Cherry Cobbler Baker's Twine, Vanilla EP, Heat Gun, Sponge, Dimensionals, Glue Dots, Scissors, Stampin' Pierce Mat

Non-Traditional Fold Card:

I choose to do a Stair Step Fold Card and you can find the tutorial HERE on SCS.  I think this would make such a fun stamp camp project and there are so many ways you can "dress up" the folds.  For the first front fold I embossed it using the new Delicate Designs Folders, and then added a Gumball Green bow and Merry Christmas saying.  For the second fold I punched a strip of Very Vanilla c/s using the Lace Ribbon Border Punch, and then layered a piece of Gumball Green Satin Ribbon over the middle.  For the back fold I embossed a scrap piece of Very Vanilla c/s using the Delicate Designs Folder and then cut it out.  I added some Cherry Cobbler brads to add some contrast.  For the focal point of the card, I started by cutting out circle using Cherry Cobbler c/s and the 3-1/2" Circle Die.  I layered on 3" Very Vanilla circle.  I stamped 2 ornaments - one in Cherry Cobbler and the other in Gumball Green.  They were punched out using the ornament punch and the leaves that they are "hooked" on were made using the Bird Builder Punch.  Here's the rest of the details:


Front view of the card


Side views

Stamps: Delightful Decorations
Inks: Gumball Green, Cherry Cobbler
Papers: Very Vanilla, Cherry Cobbler, Gumball Green
Accessories:  Big Shot, Delicate Designs Folders, 3-1/2" Circle Die, 3" Circle Die,  Lace Ribbon Border Punch, Ornament Punch, 3/4" Circle Punch, Bird Builder Punch, Cherry Cobbler Brads, Very Vanilla Brad, Gumball Green Stitched Satin Ribbon, Cherry Cobbler Baker's Twine, White Baker's Twine, Dimensionals, Scissors

Holiday Focus - Masculine Christmas Card

Manly Christmas cards are hard to come by, and this is a great challenge that will offer up some great ideas!  For my card I used the trusty Lovely as Tree set, and like how this card turned out.  I embossed the tree onto a piece of First Edition Specialty DSP using Vanilla embossing powder, and the rubbed some Gumball Green and Cherry Cobbler ink around the image.  I took a scrap piece of Very Vanilla c/s and ran it through my Big Shot using the Square Lattice EF, and then folded it and tore the edges.  It's hard to see, but when I was finished I spritzed on some Vanilla Shimmer Smooch and love how it really gives the card a nice shimmer!


Stamps: Lovely as a Tree
Inks: Gumball Green, Cherry Cobbler
Papers: Very Vanilla, Cherry Cobbler, Gumball Green, First Edition Specialty DSP
Accessories:  Big Shot, Square Lattice EF, Houndstooth EF, Vanilla EP, Heat Gun, Cherry Cobbler Button and Baker's Twine, Very Vanilla Brads, Paper Distressing Tool, Vanilla Shimmer Smooch, Sticky Strip Tape, Dimensionals, Scissors, Sponge

Thursday, June 28, 2012

Paper Piercing LNS Challenge

Paper Piercing - what a great technique that is so simply to do, yet adds so much to a project!   Stampin' Up! has come out with some awesome paper piercing packs that totally rock, and I love the fact they coordinate with some of our stamps sets and punches.

For my cards this week I decided to go CAS (clean and simple).  I stamped the background image on the main card front first using the new In-Color, Summer Starfruit.  I then punched a circle on the front panel using the 2-1/2" Circle Punch so the background image was underneath. and paper pierced around the outside of the circle using the Essentials Paper-Piercing Pack (on page 181).  I used my Big Shot and one of the Delicate Designs EF to create an edge along the left-hand side.  I stamped the bird twice using the new In-Color Raspberry Ripple, and cut out the bird from one image and just the wing from another.  I used the Bird Builder Punch for the 2 leaves and used Gumball Green c/s.  Very simple, clean and easy!  Here's the details:

Stamps: Betsy's Blossoms, Teeny Tiny Wishes
Inks: Raspberry Ripple, Summer Starfruit
Papers: Whisper White, Gumball Green
Accessories: Big Shot, Delicate Designs EF, 2-1/2" Circle Punch, Word Window Punch, Bird Builder Punch, Essentials Paper-Piercing Pack, Paper Piercing Tool, Pearls, Dimensionals, Mini-Glue Dots, Scissors

Thursday, May 17, 2012

LNS Challenge

This week's LNS Challenge is to use our wonderful DSP in a project.  I thought I would do something other than a card and created a Welcome sign for my office, and used a 8" x 10" canvas for the base.  I used the Serif Essentials Alphabet Bigz Dies for the letters.  I used coasters for the base of the letters using the Alphabet dies, and then covered the letters with DSP cut using the same dies.  I created the flowers using the Blossom punch for the larger flower, and the 1-3/4" Scallop Circle Punch for the smaller one, and then sponged the edges with Riding Hood Red ink.  I then used the Beautiful Wings Embosslit Die and pearls for the butterfly accents.  I used the Blossom Petals Builder Punch for the leaves, folded them in half and then ran them through a crimper. Here's a list of what I used:


Stamps: None
Inks: Riding Hood Red
Papers:  Whisper White, Twitterpated DSP
Accessories: Big Shot, Serif Essentials Alphabet Bigz Dies, Beautiful Wings Embosslit Die, Blossom Petals Builder Punch, Blossom Punch, 1-3/4" Scallop Circle Punch, Pearls, Pretty in Pink Ribbon, White Brads, Mini-Glue Dots, Dimensionals, Paper Piercing Tool, Sponge, Crimper, Bone Folder, Glue Stick, Canvas, Coasters

Thursday, April 19, 2012

LNS Pink, Green and Yellow Challenge

My husband's nephew and his wife had a baby girl last week, and I needed a baby card to go along with the gift I bought them.  So this week's challenge was perfect for me, and I used these colors to make a onesie baby girl card.  My idea for this card came from one that I saw on SCS, and you can view the card HERE.

I used a regular sized card and cut the sleeves 1/4" down and 1" in.  I used a 1-3/8" Circle Punch for the holes at the top and bottom and then used a Scallop Circle Punch for the accent trim.  It's very easy to punch out the accent pieces:

First you punch out a circle on a scrap piece of cardstock using the 1-3/8" circle punch:


Next you line up the circle in the scallop punch as show below:


Very simple way to make accent pieces and this idea works with a lot of our other punches as well.  I used a lot of punches for this challenge to make the flowers (Boho Blossoms Punch), eyelet trim (Eyelet Border Punch), Sleeve Trim (Scallop Trim Border Punch), 1/4" Circle Punch for the bottom snaps and I used the Bird Builder Punch for the leaves.  Added So Saffron brads in the middle of the flowers and matching ribbon. Here's the details:

Stamps: Pennant Parade (saying)
Inks: Pear Pizzazz
Papers: Whisper White, Blushing Bride, Pear Pizzazz
Accessories:  Big Shot, Perfect Polka Dot EF, So Saffron Brads and Ribbon, Punches: Word Window, Boho Blossom, 1-3/4" Scallop Circle, Eyelet Border, Scallop Trim Border, Bird Builder and 1/4" Circle Punch, Paper Piercing Tool, Scissors, Dimensionals, Mini-Glue Dots

Saturday, August 27, 2011

Field Flowers

Field Flowers Stamp Set - by Stampin' Up!

My favorite set right now to use if called Field Flowers, and you can find this awesome set onpage 120 in the new 2011/12 Idea Book.


I saw a card in the SCS gallery by Lori Burkitt, and loved how she layed out her card (you can see this beauty HERE).  I took the basic layout and applied it to the card below.  This is one of the projects we will be doing at my stamp camp tomorrow!


Stamps: Field Flowers, Script, Always Thankful (saying)
Inks: Soft Suede, Old Olive, Marina Mist
Papers: Very Vanilla, Soft Suede, Beau Chateau DP
Accessories: Large Oval Punch, Very Vanilla Brads, Early Espresso 3/8" Quilted Satin Ribbon, Paper Piercing Tool, Sponge, Scissors, Dimensionals, Distressing Tool