Labels

Thursday, December 31, 2009

Vintage Vogue Card

I took this picture this morning and I think it shows the layering better. Happy New Year!

This week's LNS Challenge was to make a card using a brad. I pre-ordered this set, Vintage Vogue, from the upcoming new Occasions Mini-Catalog and thought I would use it for this challenge. This mini-catalog offers stamps in either the traditional wood blocks - or - in clear mount. I also ordered the clear-mount block set and really like using them! The sides are grooved for easy gripping and stamping. The leaves in back of the flower were made using the new Extra Large Two-Step Bird Punch from the mini-catalog. The border on the right-hand side was made from the new Scallop Trim Border Punch available from the upcoming Sale-A-Bration event starting on January 5th! For ever $50.00 you spend in product, you receive a FREE set from the SAB catalog - or - any of the sets listed in the back of the SAB brochure. Below is what I used for this card - Happy New Year's everyone!

Stamps: Vintage Vogue
Inks: Old Olive, Rich Razzleberry
Paper: Whisper White, Old Olive, Rich Razzleberry
Accessories: Clear Mount Blocks, Stamp-a-Ma-Jig, Scallop Trim Border Punch, Mistletoe Old Olive Ribbon, Extra Large Two-Step Bird Punch, Circle Ice Rhinestone Brad, Stampin' Dimensionals, Mini-Glue Dots, Scissors, Sponge


Love the new punches! They punch nice and smooth, and love how they "fold" up when you're done!

Sunday, December 20, 2009

Out of the Box Christmas Card


This week's LNS challenge was to come up with a Christmas card using non-traditional colors, and this is what I came up with. I stamped the ornaments twice using a Rich Razzleberry inkpad, punched them out using the ornament punch, and folded one of the ornaments in-half. I then mounted one ornament on top of the other using mini-glue dots. The ornament and bird are from the Merry Details Die from the Holiday Mini Catalog. I had a piece of Rich Razzleberry cardstock left over that I used to cut a Top Note Die from and mounted the designer paper underneath the cut out image. Here's the details:

Stamp Sets: Delightful Decorations
Inks: Rich Razzleberry
Papers: Whisper White, Rich Razzleberry, Crushed Curry, Razzleberry Lemonade DP
Accessories: Silver Brads, Paper Piercing Tool, Crushed Curry Ribbon, Silver Cording, Merry Details Die, Big Shot, White Gel Pen, Ornament Punch, Mini Glue Dots, Adhesive, Dimensionals, Scissors

Thursday, December 17, 2009

Mug Card


I needed something fast to make for a gift card for one of Ben's teacher and came up with this mug card. I had some Starbuck's drink holders and one of them would make a cute base for the the mug. Like I said, I had to come up with something fast!

Stamp Sets: Delightful Decorations, Serene Snowflakes, Season of Joy
Inks: Glorious Green, Real Red, Ballet Blue
Papers: Whisper White
Accessories: Ornament Punch, Scissors, Sponge, Silver Cording

Wednesday, December 16, 2009

Post It Note Holders


I have been busy this week making post-it-note holders (out of coasters) for my co-workers at school. I am making 10 and it is taking a little bit longer than I thought, but I like how they are turning out. I didn't go with a holiday theme because I wanted them to be able to use them all year long. I did one with a Rose Red background and one with a Regal Rose background. I decided to go with the Rose Red background because I liked the way it looked. The buttons are from my button stash. I am going to put them in a cell-o bag and tie a red ribbon at the top; I'll take a picture when I am done. I still have to go to the store and buy some post-it-notes! I got the original layout from a card I saw in the January issue of Stampin' Success; which is a monthly magazine Stampin' Up! sends to all it's demonstrators. Well I need to keep working - thanks for stopping by!

Stamps: Bloomin' Beautiful, Itty Bitty Backgrounds
Inks: Going Grey, Basic Black, Pretty in Pink, Rose Red, Regal Rose, Certainly Celery, Old Olive
Papers: Whisper White, Pretty in Pink, Rose Red, SAB Delicate Dots DP (retired)
Accessories: Certainly Celery Ribbon, Pretty in Pink Satin Ribbon, Eyelet Border Punch, Watercolor Brush, Stapler, Coasters, Post-it-Notes, Buttons, Adhesive

Friday, December 11, 2009

Caroling Card


Yesterday's SCS challenge was to make some type of card that relates to caroling. The set, Song in Your Heart, was one of the first SU sets I bought, and I think is perfect for this challenge! Hope you like how it turned out, it took me a while to color and lay out. For this card, I used:

Stamp Sets: Song in Your Heart, Itty Bitty Backgrounds
Papers: Whisper White, Apricot Appeal, Real Red
Inks: Basic Black, Apricot Appeal, Real Red, Garden Green, Brocade Blue, Pretty in Pink, So Saffron, Bordering Blue, Close to Cocoa, Only Orange, Going Gray
Accessories: Big Shot, Top Note Die, Apricot Appeal Ribbon, Petals-a-Plenty Folder, Watercolor Brush, Scissors, Sponge, Mini-Glue Dots, Dimensionals

Wednesday, December 9, 2009

Another SCS Challenge Card


I had a few minutes after work to play along with today's SCS Sketch Challenge. I used a very old (retired) set called Gingerbread House. I haven't watercolored in a long time and it felt good to sit and "color"! I used a 2-way Glue Pen along the edges of the house and then added some Dazzling Diamonds Glitter. Here's a list of the supplies:

Sets: Gingerbread House
Inks: Basic Black, Glorious Green, Creamy Caramel, Close to Cocoa, Red Red, Brilliant Blue
Papers: Whisper White, Creamy Caramel, Real Red, Merry Moments DP
Accessories: Red & Chocolate Chip Ribbons, Eyelet Border Punch, Watercolor Brush, 2-Way Glue Pen, Dazzling Diamonds Glitter, Scissors, Dimensionals, Sponge

Tuesday, December 8, 2009

SCS & LNS Challenge


I combined 2 challenges for this card - SCS color challenge and this week's LNS challenge. The colors for the SCS challenge were Barely Banana, Always Artichoke and Rich Razzleberry. I didn't have any Artichoke ribbon and dyed some Whisper White Organza Ribbon that color. It's hard to see, but I lightly used one of the images from Itty Bitty Backgrounds in Barely Banana in the open white spaces. Thanks for stopping by - here's the recipe:

Stamps: Inspired by Nature, Itty Bitty Backgrounds
Markers: Barely Banana, Always Artichoke, Rich Razzleberry
Papers: Whisper White, Rich Razzleberry, Barely Banana, Razzleberry Lemonade DP
Accessories: Always Artichoke Brads, Piercing Tool, Large Oval Punch, Top Note Die, Big Shot, Whisper White Organza Ribbon, Sponge, Dimensionals

Monday, December 7, 2009

Dasher SCS Card


I had a little bit of time today to play along with today's SCS Clean & Simple Challenge before I left for work, and this is what I came up with. It's hard to tell, but I added some Champagne Mist Shimmer Paint on the border after I colored in the center of the flowers with a Real Red Marker. Love the Shimmer Paint and definitely need to order more before the Winter Mini expires on January 4th! Have a great day everyone - here's the recipe:

Stamp Sets: Dasher, Delightful Decorations, So Many Scallops (retired)
Inkpads & Markers: Chocolate Chip, Real Red
Papers: Whisper White, Real Red, Chocolate Chip
Accessories: Big Shot, Petals-a-Plenty EF, 3/4" Circle Punch, 1-1/4" Circle Punch, Designer Label Punch, Champagne Mist Shimmer Paint, Sponge Dauber, Red Gingham Ribbon, Dimensionals, Mini-Glue Dots

Friday, December 4, 2009

Dasher with Shimmer Paint

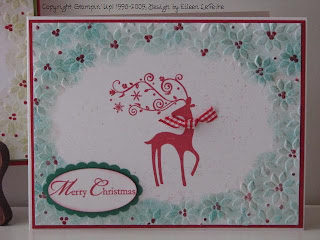
I wanted to apply the concept of using a raised piece of chip board (I used 2 oval matted picture frames) on top of an embossing folder and then running it through your Big Shot. I learned this technique from Patty Bennett's blog (http://pattystamps.typepad.com/). After I ran my cardstock through my Big Shot, I used a sponge dauber to lightly sponge color on the flowers (Old Olive on one, Glorious Green on the other). I then sponged some Frost White Misting Paint on the flowers with a sponge dauber. I then colored in the center of the flowers with a Real Red marker. Stamped the deer from Dasher in the middle and added a bow on his neck with a Mini-Glue Dot. Hope you like the cards - I am off to school and have to admit I am not looking forward to standing out in the cold and snow for 2 hours!! Have a good day!


The colors used in this card are Glorious Green and Real Red


Colors used in this card are Old Olive, Real Red and Whisper White.


Thursday, December 3, 2009

Window Card


I saw a really cute card on SCS done by Julie Freysinger and this is my version. You can find her card on here: http://twofriendsstamping.typepad.com/two-friends-stamping/2009/11/from-our-house-mojo-114.html. I changed a few things around; I used a 1-1/4" Square Punch instead of the 1-3/8" punch Julie used and added the little Christmas trees from the Merry Details Embosslit. Here's the supplies I used:

Stamps: Sweet Season
Inks: Chocolate Chip, Real Red Marker
Papers: Real Red, Old Olive, Whisper White, Chocolate Chip DP
Accessories: 1-1/4" Square Punch, Merry Details Embosslit, Big Shot, Large Oval Punch, Scallop Edge Punch, Real Red 1/2" Striped Grosgrain Ribbon, Mini Silver Library Clip, Mini-Glue Dots, Stampin' Dimensionals

Tuesday, December 1, 2009

Christmas Tree Card & Shimmer Paint


Patty Bennett has a wonderful project on her blog (http://pattystamps.com/pattys_stamping_spot/2009/11/petals-a-plenty-christmas-tree.html) that shows step-by-step how to do a Christmas tree using the Petals-a-Plenty embossing folder. I thought I would give it a try and this is the card I came up with. The tree was pretty easy to make. I cut out a tree pattern on a coaster, cut out 2 other coasters to match and glued them together. You then layer the tree ON TOP of the embossing folder, and layer your cardstock inside the folder. Put a clear cutting pad on top and run it through your Big Shot using Tab 2 underneath. Very cool concept that you can apply with a lot of other items - frames, etc. It's hard to see, but after I sponged some Old Olive on the embossed tree I took a dauber duo and sponged some Champagne Mist Shimmer Paint on the tree. Next I sponged shimmer paint on one of the Itty Bitty Backgrounds stamp and stamped along side of the tree. I love, love the shimmer paint! Here's the recipe:
Stamp Set: Itty Bitty Backgrounds, Warm Words
Inks: Old Olive, Real Red Marker
Papers: Old Olive, Real Red, Whisper White, Retired Holiday Thyme DP (star)
Accessories: Gold Brad, Real Red Eyelet, CAD, Big Shot, Petals-a-Plenty Embossing Folder, Paper Piercing Tool, Oval Punch, Scallop Oval Punch, Champagne Mist Shimmer Paint, Sponge Dauber, Gold Cording, Stampin' Dimensionals
Accessories: