Labels

Wednesday, December 22, 2010

Christmas Card

Merry Christmas everyone; I hope you are able to relax and enjoy the holidays with your loved ones and friends!  Today's is Ben's birthday; I can't believe he is 15 today!  Lucky guy, he had to get up really early for wrestling practice.  But he is a happy camper now that his gifts are open, and we are taking him to Lou Malnati's for pizza later; yumm-o!

Richard's family is pitching in together to buy their Mom & Dad a gift certificate to the dining room at their retirement home.  I made the following card for everyone to sign; I hope they like it.  I cut the flowers out on one of the sheets of the designer paper and layered them over each other.  The flowers were framed using the oval die and dp/Chocolate Chip c/s.  Added some pearls around the center of the main flower and added a bow using a piece of retired Chocolate Chip Ribbon.  I cased this card from the amazingly talented Karen Barber (You can view her card HERE)  Here's the details:


Stamps: Bells & Boughs
Inks: None.......
Papers: Deck the Halls DP, Chocolate Chip, Cherry Cobbler, Crumb Cake, Very Vanilla
Accessories: Big Shot, Oval Die, Chocolate Chip Ribbon, Pearls, Scissors

Monday, December 13, 2010

Gable Boxes

I made the following boxes to sell at the Holiday Boutique and these 2 are what I have left.  I think they would make a cute gift box that you could fill with some fun soaps and lotions, etc.!  If you're interested, I am selling them for $6.00/each!


Saturday, December 11, 2010

A Cute Christmas Frame

I found some notecards that SU sold many years ago that has some fun squares already drawn on them,  and thought they would make for a cute Christmas frame using A Cute Christmas.  I used my Stamp-a-ma-jig to place the images, and then watercolored them in.  I added some glitter to the main tree and snowman, gold cording on the ornaments, and pearls on the mittens.  I backed the notecard with a piece of Candy Cane Christmas dp, and added a piece of Real Red ribbon.  I think it turned out cute!


Stamps: A Cute Christmas
Papers: Whisper White, Garden Green, Real Red, Candy Cane Christmas
Inks: Garden Green, Real Red, Baja Breeze, Blushing Bride, Basic Black, Close to Cocoa, So Saffron
Accessories: Gold Cording, Pinking Hearts Border Punch, Real Red Ribbon, Pearls, Watercolor Brush, Dimensionals, Dazzling Diamonds Glitter, 2-Way Glue Stick

Thursday, December 9, 2010

Joy Picture

I thought I would give it a try to see how a sheet of Deck the Halls designer paper would look in a picture frame, and this is what I came up with.  I cut some flowers out from another sheet and placed them on the bottom popping them up with some dimensionals.  I then added some pearls on the center of the flowers and put a golden bow at the corner.


Sunday, December 5, 2010

LNS Challenge #98

Now that the Holiday Boutique is done, I can get back to doing some challenge cards!  Unfortunately we had out first snow of the season the day of the boutique, so we didn't have the greatest turnout.

This week's LNS challenge was to make a Christmas card, but you couldn't use any green or red in the card.  This is what I came up - gold/black/white.  I used the Northern Frost Decorative Strip (Holiday mini; page 38) for the snowflakes, and embossed the saying using the set, Bells & Boughs (Holiday mini; page 19) using gold embossing powder/heat gun.  Added a black and 2 gold glimmer brads (Holiday mini; page 36).  Here's the pic and the details:


Stamps: Bells & Boughs
Inks: VersaMark pad
Papers: Brushed Gold, Whisper White, Basic Black
Accessories: Big Shot, Northern Frost Decorative Strip, Gold/Black Glimmer Brads, Whisper White Ribbon,  Gold Embossing Powder, Heat Gun, Large Oval Punch, Dimensionals

Thursday, December 2, 2010

Another Scratch Pad Holder

Here is another scratch pad holder made with my favorite color combos, Old Olive and Rich Razzleberry!


Wednesday, December 1, 2010

Scratch Pad Holder

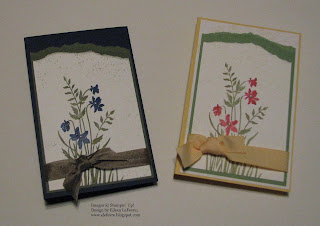
I decided that I wanted to a scratch pad holder to sell at the Holiday Boutique, and this is the design I came up with.  They are pretty easy to put together, it probably takes more time to design the front panel.  The picture quality isn't the best for this, but you get the idea!  I used Night of Navy and Always Artichoke for one holder and So Saffron, Rose Red and Wild Wasabi for the other one.  The stamp set I used is called Just Believe; one of my favorite sets!  I am going to place them in clear bags, tie a ribbon at the top and add a gift tag.

The base piece of card stock is 5-1/2" x 7-1/2" and score at 3-1/2" and 4".  You can then layer from there.  I attached the scratch pad with some adhesive.


The lighting isn't the best in my office; especially with the Night of Navy card stock.  But here is a picture of the inside, which can be "dressed" up as well.

Gift Card Holders

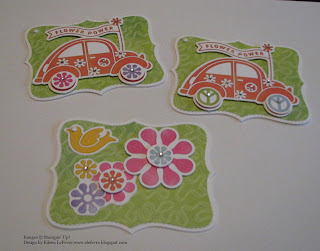
I have been stamping pretty much non-stop now for about a month - I get up stamp, go to work, come home and stamp!  Why am I stamping 24/7???  Because I am participating in a Holiday Boutique this coming Saturday at the Fremont Middle School (doors open up at 9:00 a.m.).  So far I have made 400 gift tags, 75 nugget boxes, 50+ gift card holders, made calendars on a click, gable boxes, stamped on tins and more - I love it!!  Below are some gift card holders that I made.  I got the inspiration from Becky Jensen (Link to Becky's blog).  These babies are fast and easy.  I have to admit that I am paper hoarder and am very glad that I am!  The samples you see here are from retired kits that I have had for many years.

I used my Big Shot and Top Note Die to make the holders.  You simple cut 2 pieces of solid cardstock, and 2 pieces of desired designer paper.  Run them through the BS, trim the border on the designer paper and put them together.  I put a brad in the corner so you can open and close the holder easily.


This little guy is my favorite gift holder.  I am going to use this one for my $15.00 gift raffle!  Thanks for taking a peek - hope to see you on Saturday at the Boutique!